5 Steps on How-To Configure Screen Time Settings To Protect Your Family (Apple Device)
How to Setup Screen Time Settings on an iPad or iPhone
Our children of today have access to smart devices which opens their world to so many wonderful opportunities on the internet. However, this abundance of data and knowledge comes with its pit-falls. The internet is also flooded with inappropriate content which our children need to be protected from. Apple’s newer IOS devices (IOS16 or later) come standard with an application called Screen Time. This app can be configured to set screen time limits and parental control settings to protect your child from harmful content. There are 2 options to set up screen time namely, through Family Sharing or directly on the child’s device.
I advise that depending on the child’s age and maturity, it is always wise to have a conversation with them before setting restrictions. Explain to them the dangers on the internet and how harmful the content could be to their growth and health. Then agree the time limits for device use without compromising the content restrictions for pornography, hate speech, drugs, gambling etc. i.e. ensure these are blocked at all times. I will show you how.
What is Screen Time?
You can utilize Screen Time to track the amount of time you spend on your iPhone, iPad, or iPod touch in real-time. With Screen Time, you can receive detailed reports on the time you and your children spend on apps and websites, and even set limits on usage as needed. You can also manage a child’s device using parental controls.
When you turn on Screen Time, you’ll be able to view reports on your device usage, apps, and websites. If you are managing a child’s device, you can configure Screen Time and settings from your own device using Family Sharing. Additionally, you can create a passcode specifically for Screen Time to ensure that only you can change settings or extend usage time.
If you forget your Screen Time passcode, you can reset it by updating your device to the latest iOS or iPad OS. By setting a Screen Time passcode, you can set limits on app usage, see your device usage report, and view overall usage across multiple devices if you have enabled Share Across Devices.
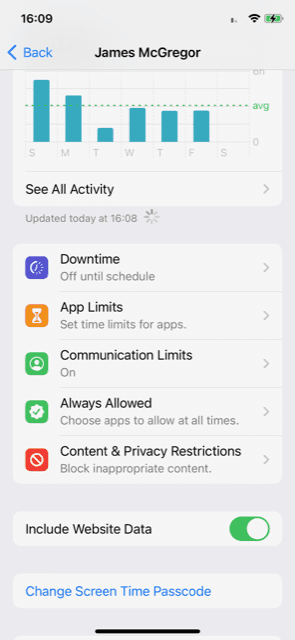
Downtime is a feature that enables you to schedule a time period where only certain apps and phone calls will be available. You will receive a notification five minutes prior to the start of downtime, and if you set a Screen Time passcode, you can add an additional setting called “Block At Downtime.” With this feature, you can approve app usage for a set time period when your child requests it.
App Limits allow you to set daily usage limits for certain app categories, such as social networking or games, and refresh every day at midnight. Communication Limits allow you to control who your children can communicate with throughout the day and during downtime, and Always Allowed ensures that specific apps such as Phone, Messages, FaceTime, and Maps are always available. You can also utilize Content & Privacy Restrictions to block inappropriate content, purchases, and downloads, and set privacy settings on your device.
Reasons You Need to Know How to Setup Screen Time.
I will show you step by step instructions on how to set up screen time via Family Sharing or directly on the device. This will ensure you have configured the settings correctly and can rest easy that your child is safe. I have been managing my childrens devices for years and it is a very useful way to ensure that they are not straying into content they shouldn’t be viewing.
Screen time protection is important in this digital age due to the vast amount of inappropriate content on the internet. Children don’t always intend to come across bad content, but sometimes they accidently are presented with images that would make your hair stand on end.
Below is a guide on how to set up screen time to protect your family from the dangers of the internet.
Read my post on “Amazing Truths About Tweens, Teens and Their Screens”
Step-by-Step Instructions to set up Screen Time via Family Sharing
Step 1 – Setup Family Sharing
Step 2 – Turn on Screen Time
Step 3 – Set a Screen Time Passcode
Step 4 – Manage Screen Time Settings
Step 5 – See your report and set limits
Step 1 – Setup Family Sharing
You can start a new family group and invite people to join, or you can join someone else’s family group.
- Start a family group
- Invite people to join your family
- Join a family group
- If you can’t accept the invitation
Family Sharing makes it easy for up to six family members to share music, movies, TV shows, apps, books, subscriptions including iCloud+, and more, all without sharing an Apple ID. You can set up an Apple ID for kids, set permissions remotely with Screen Time, and approve spending and downloads from a parent’s device with Ask to Buy.
Start a family group
One adult in the family — the family organizer — can set up Family Sharing for the group from their iPhone, iPad, or Mac. If purchase sharing is turned on, the family organizer pays for family members’ purchases and must have a valid payment method on file.
On your iPhone or iPad:
- Go to Settings.
- Tap your name.
- Tap Family Sharing, then tap Set Up Your Family.
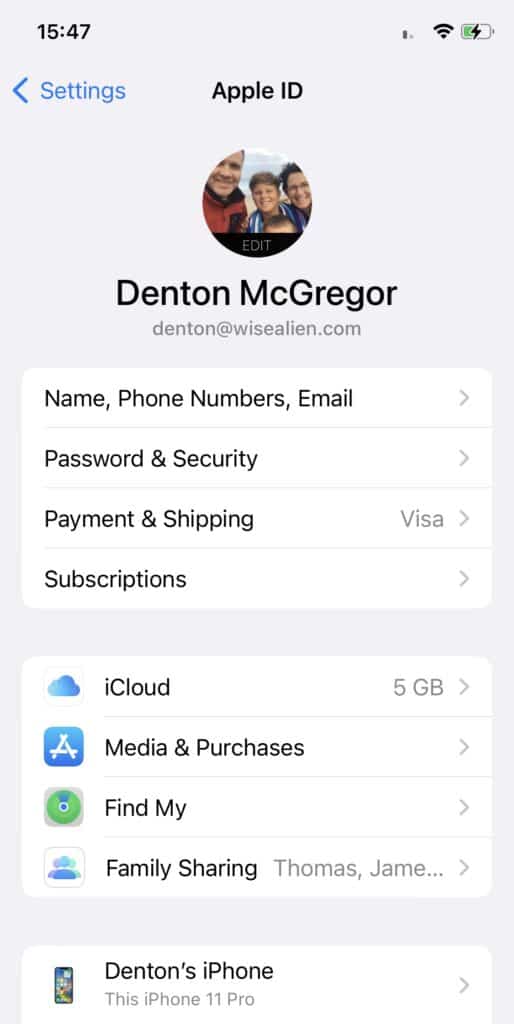
- Follow the onscreen instructions to setup your family and invite family members
Invite people to join your family
If you choose to invite people later or want to add another member to your family, you can send an invitation via Messages, email, or in person.
If you have multiple Apple IDs, you can invite each of your accounts to the group, so you can share purchases from your other Apple IDs with your family.
On your iPhone or iPad with iOS 16 or later:
- Go to Settings.
- Tap Family.
- Tap Add Member

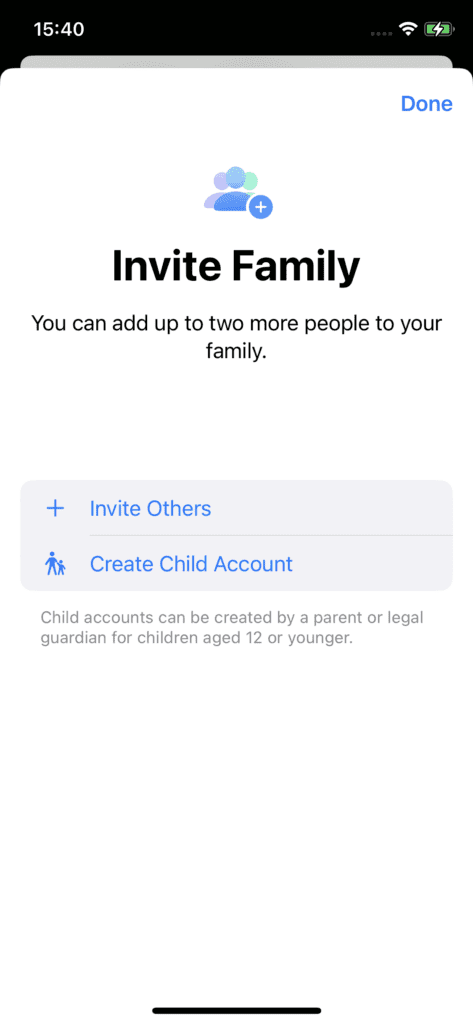
- If your child doesn’t have an Apple ID, tap Create an Account for a Child. But if your child already has an Apple ID, tap Invite Others > Invite In Person > Enter their Apple ID password on your device to accept the invitation.
- Follow the onscreen instructions to set up parental controls, location sharing, and more.
On your iPhone or iPad with iOS 15 or earlier:
- Go to Settings.
- Tap your name, then tap Family Sharing.
- Tap Add Member.
- If your child doesn’t have an Apple ID, tap Create an Account for a Child. But if your child already has an Apple ID, tap Invite People. They can enter their Apple ID password on your device to accept the invitation.
- Follow the onscreen instructions.
Join a family group
Accept or decline an invitation to join a family directly from your device. You’ll get an invitation by email or in a text message. Then you can respond right from the invitation. If you miss the email or text invitation, use the steps below to respond from your device. You can be a part of only one family at a time.
On your iPhone or iPad:
- Go to Settings.
- Tap your name.
- Tap Invitations.
- To accept an invitation, follow the onscreen instructions. When you join a family, you might be asked to confirm your account information and to opt in to any features or services your family set up. Typically subscriptions like apple music are ones the kids love.
If you can’t accept the invitation
If you can’t accept the invitation, see if someone else joined a family with your Apple ID. Remember, you can only join one family at a time, and you can only switch to a different family group once per year.
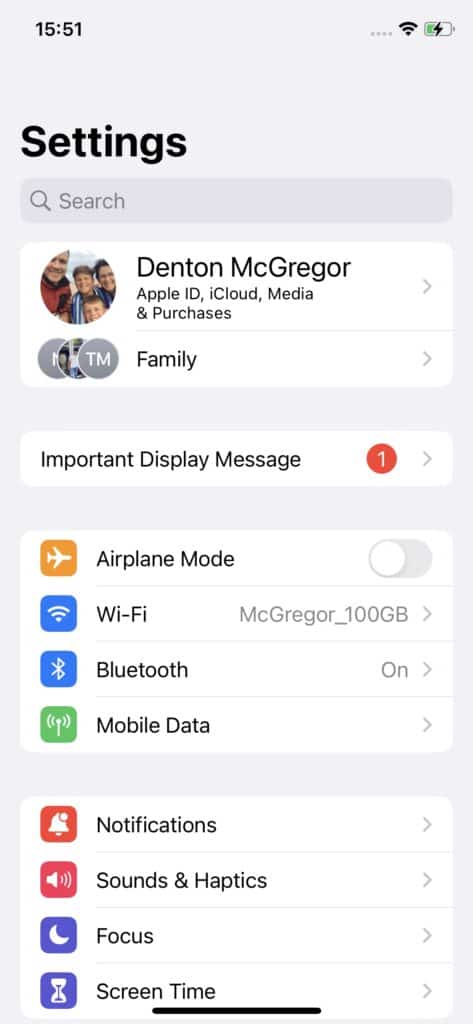
Step 2 – Turn on Screen Time
You can now turn screen time on by:
- Go to Settings > Screen Time.
- Tap Turn On Screen Time, then tap it again.
- Select This is My [device] or This is My Child’s [device].
After you turn on Screen Time, you’ll see a report showing how you use your device, apps, and websites. If it’s your child’s device, you can set up Screen Time and create settings on their device or you can use Family Sharing to configure your child’s device from your device. After you set up your child’s device, you can also use Family Sharing to see reports and adjust settings from your device.
With Screen Time, you can also create a dedicated passcode to secure settings, so only you can extend time or make changes. Make sure to choose a passcode that’s different from the passcode that you use to unlock your device. To change or turn off the passcode on your child’s device, go to:
- Settings > Screen Time and tap your child’s name.
- Then tap Change Screen Time Passcode or Turn Off Screen Time Passcode, and authenticate the change with Face ID, Touch ID, or your device passcode.
Step 3 – Set a Screen Time passcode
You can set a passcode so that only you can change Screen Time settings and allow more time when app limits expire. Use this feature to set content and privacy limitations for your child’s device. The steps to set up a Screen Time passcode depend on whether you’re using Family Sharing.
If you’re using Family Sharing to manage a child account:
- Go to Settings and tap Screen Time.
- Scroll down and choose your child’s name under Family.
- Tap Turn on Screen Time, then tap Continue.
- Set up Downtime, App Limits, and Content & Privacy with the limitations that you want for your child, or tap Not Now.
- Tap Use Screen Time Passcode, then enter a passcode when prompted. Re-enter the passcode to confirm.
- Enter your Apple ID and password. This can be used to reset your Screen Time passcode if you forget it.
If you’re not using Family Sharing to manage a child account:
Make sure that you’re on the device used by the child.
- Go to Settings and tap Screen Time.
- Tap Turn on Screen Time.
- Tap This is My Child’s [device].
- Set up Downtime, App Limits, and Content & Privacy with the limitations that you want for your child, or tap Not Now.
- Tap Use Screen Time Passcode, then enter a passcode when prompted. Re-enter the passcode to confirm.
- Enter your Apple ID and password. This can be used to reset your Screen Time passcode if you forget it.
Step 4 –Manage Screen Time Settings
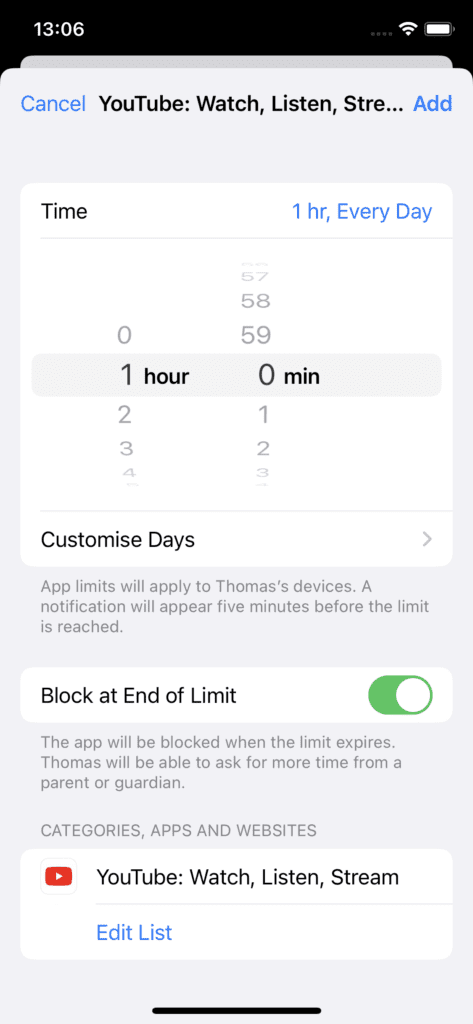
- Go to Settings > Screen Time > Select Child (if setting time for him/her).
- Then tap See All Activity, select a category in the list shown to set limits.
- Select “Add Limit” > enter screen time passcode > set limit > toggle “Block at End of Limit” to enable blocking.
If you don’t use the “See All Activity” option, you can manage the below settings with Screen Time once you have selected the child who’s device you want to configure:
Downtime:
When you schedule downtime in Settings, only phone calls and apps that you choose to allow are available. Downtime applies to all of your Screen Time-enabled devices, and you get a reminder five minutes before it starts. If you set a Screen Time passcode, Downtime includes an additional setting: Block At Downtime. When you choose this setting and you click Ask For More Time when Downtime starts, entering the passcode allows you to approve the app for 15 minutes, an hour, or all day.
Child accounts can click One More Minute once, or click Ask For More Time to send their request to the parent account for approval. So chose a time in the morning that you wish them to have access and a time in the afternoon/evening that you wish them to be off their devices.
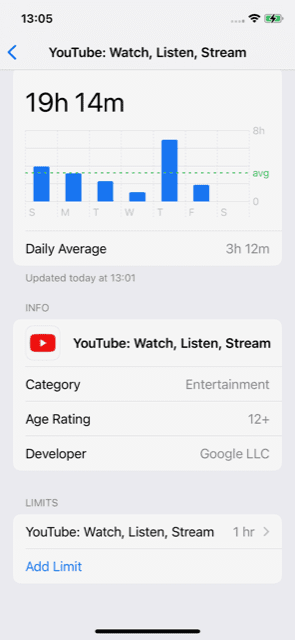
App Limits:
You can set daily limits for app categories with App Limits. For example, you might want to see productivity apps while you’re at work, but not social networking or games. App Limits refresh every day at midnight, and you can delete them any time.
Communication Limits:
Control who your children can communicate with throughout the day and during downtime. These limits apply to Phone, FaceTime, Messages, and iCloud contacts. This is also where you can decide and manage which contacts are available on an Apple Watch paired through Family Setup. Communication to known emergency numbers identified by your iPhone or Apple Watch cellular carrier is always allowed. You need to have your iCloud contacts enabled to use this feature.
Always Allowed:
You might want to access certain apps, even if it’s downtime or if you set the All Apps & Categories app limit. Phone, Messages, FaceTime, and Maps are always allowed by default, but you can remove them if you want. For example if you want your child to always be able to Whatsapp you then you can set the app to be “always allowed”. You unfortunately cannot set the app to be only able to send a message to you, so they will have full access to all their contacts.
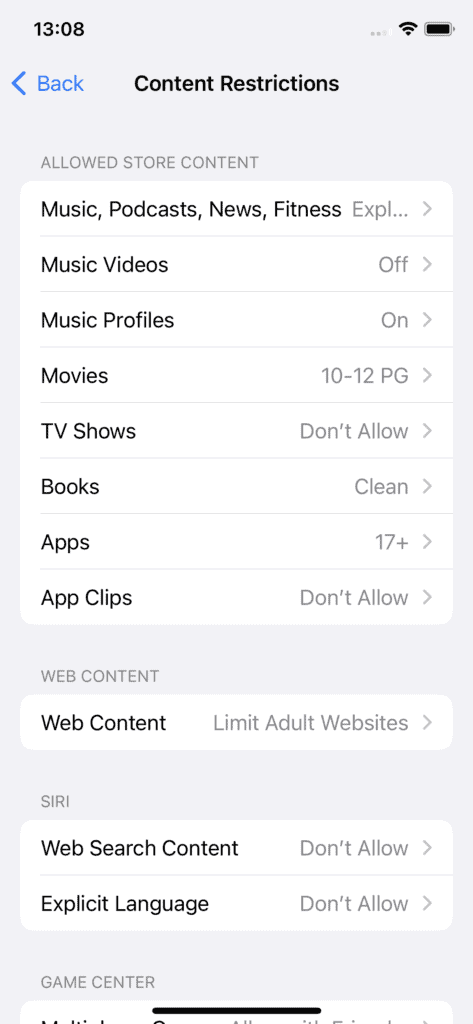
Content & Privacy Restrictions – This is an important setting.
You decide the type of content that appears on your device. Block inappropriate content, purchases, and downloads, and set your privacy settings with Content & Privacy Restrictions.
- Turn on “content & Privacy Restriction” > ‘select required option’ and review options.
- To manage content select “Content Restrictions” > Web Content > Limit Adult Websites.
- To manage the changes the child can make select “allow” or “don’t allow” under the Allow Changes section. Typically don’t allow a child to make Passcode Changes to prevent them from changing the current passcode that only you should know.

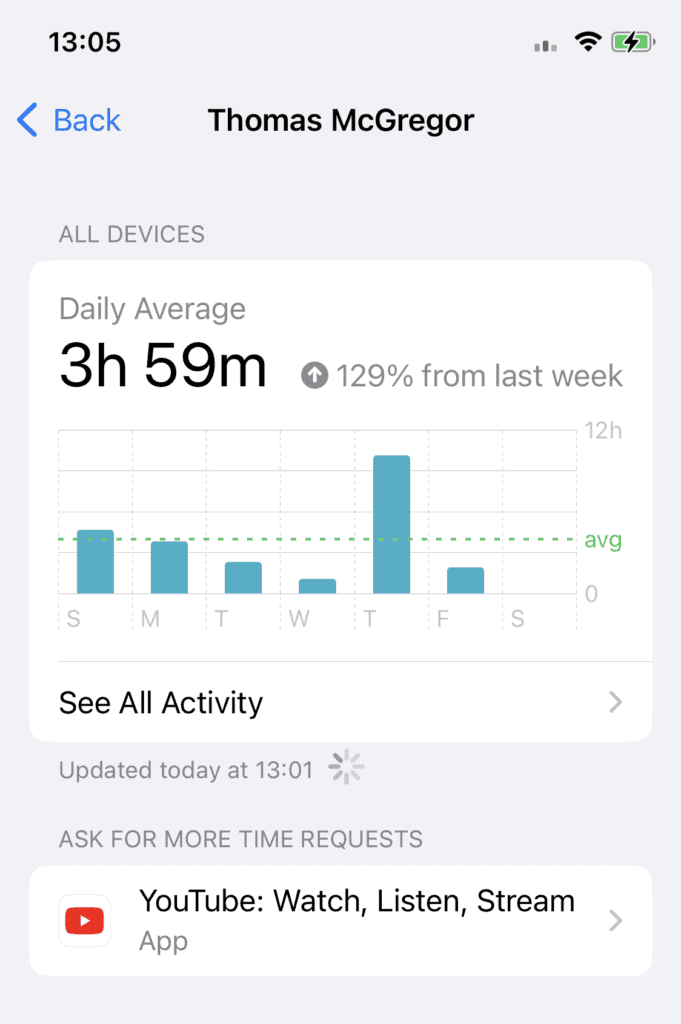
Step 5 –See your report and set limits
Screen Time gives you a report showing how your device is used, apps you’ve opened, and websites you’ve visited. To see the report, go to:
- Settings > Screen Time and tap See All Activity under the graph.
- From there, you can see your usage, set limits for your most used apps, and see how many times a device was picked up or received a notification.
If you turned on Share Across Devices, you can view overall usage across devices that are signed in with your Apple ID and password.
Key Considerations For Successfully Setting Screen Time Limits for Your Child/Children
In today’s digital age, setting screen time limits for children is becoming increasingly important. While technology has numerous benefits for kids, excessive screen time can lead to a range of negative consequences, such as sleep disturbances, social isolation, and poor academic performance. When setting screen time limits for your children, there are a few key considerations to keep in mind. First, it’s important to set clear boundaries and rules. Make sure your children know what the rules are and the consequences if they break them.
It’s also essential to communicate why these limits are in place so that they understand the importance of balancing screen time with other activities.
Second, be flexible and adjust the limits as necessary. Children’s needs and interests change as they grow, so it’s important to revisit screen time limits periodically and make adjustments as needed. For instance, if your child is participating in an online extracurricular activity, you may need to increase their screen time allowance temporarily. Similarly, if they’re struggling with excessive screen time, you may need to decrease their time limits for a period.
Third, lead by example. As a parent or caregiver, your behavior sets the tone for your children. If you’re constantly on your phone or tablet, your children are more likely to adopt these habits as well. Try to limit your own screen time and engage in activities that don’t involve technology. By modeling healthy habits, you can help your children develop a balanced relationship with technology and avoid the negative consequences of excessive screen time.
Ultimately, setting screen time limits for your children requires a thoughtful approach that takes into account their unique needs and interests, as well as the potential consequences of excessive screen time. By being flexible, clear, and leading by example, you can help your children build healthy habits and a positive relationship with technology
Wrapping Up and My Experience With Setting Screen Time Limits
In conclusion, setting screen time limits for children can be challenging, but it is an important task that can help promote healthy habits and behaviors. Throughout my experience in setting screen time limits for children, I have found that clear communication, flexibility, and modeling healthy habits are key factors in promoting a positive relationship with technology.
It is important to remember that every child is different, and what works for one child may not work for another. Therefore, it is essential to adjust the screen time limits as needed and to take into account each child’s unique needs, interests and age. Overall, setting screen time limits can be a valuable tool in promoting healthy technology use, and by being thoughtful and intentional in the approach, parents and caregivers can help their children develop a balanced and healthy relationship with technology.